Garden in the Sky - Photo Trip at Ngong Ping, Ma On Shan

Look to the far end towards the northwest from Sai Kung Town you can see a flatten hill top – and that’s Ngong Ping Plateau. At an altitude of 400m, Ngong Ping is one of the few plateaus in Hong Kong. A large area that offers unobstructed views, it is like a garden in the sky. Here you can enjoy stunning scenery spanning from the entire Sai Kung area to Kau Sai Chau, or splendid sunrise facing the east.
There are mainly two routes to go to Ngong Ping Plateau. A more common one is to take the resident bus outside Ma On Shan MTR station and start at Ma On Shan Tsuen. Walk to Ma On Shan Country Park and then uphill along Ma On Shan Country Trail. However, if you are at a location near Sai Kung, you can start at the crossroad next to Honeymoon Dessert on Sai Kung Po Tung Road and then turn to Tan Cheung Road and Pak Kong Au Road. After about 20-minute walk you will reach the starting point behind Greenpeak Villa. Follow Ma On Shan Country Trail to go uphill and then then continue on to MacLehose Trail Section 4. After an easy walk for about 1 hour you will arrive at the destination - Ngong Ping Plateau.
There are mainly two routes to go to Ngong Ping Plateau. A more common one is to take the resident bus outside Ma On Shan MTR station and start at Ma On Shan Tsuen. Walk to Ma On Shan Country Park and then uphill along Ma On Shan Country Trail. However, if you are at a location near Sai Kung, you can start at the crossroad next to Honeymoon Dessert on Sai Kung Po Tung Road and then turn to Tan Cheung Road and Pak Kong Au Road. After about 20-minute walk you will reach the starting point behind Greenpeak Villa. Follow Ma On Shan Country Trail to go uphill and then then continue on to MacLehose Trail Section 4. After an easy walk for about 1 hour you will arrive at the destination - Ngong Ping Plateau.

Route map for reference. Source: Google Map

EOS 6D • EF 24-105mm f/4L IS USM • 5s • f/11• ISO 100
Since Ngong Ping Plateau is facing east, we can include the entire Sai Kung Town in the foreground when taking sunrise photos. The result will be atmospheric as the yellowish-orange street lamps go in harmony with the dark blue early morning sky. Yellowish-orange and blue being the complementary colors can help make the photographic subject stands out. However, the street lamps in Sai Kung Town turn off automatically after sunrise, making it impossible to take photos of sunrise with the lamps on.
To create photos of similar result, you can lower the white balance setting to 4900K when taking sunrise photos to accentuate the bluish color. Read the article “Catching the Sunrise” if you wish to learn more about the skills and tips on capturing stunning shots of the dawn and the rising sun.
To create photos of similar result, you can lower the white balance setting to 4900K when taking sunrise photos to accentuate the bluish color. Read the article “Catching the Sunrise” if you wish to learn more about the skills and tips on capturing stunning shots of the dawn and the rising sun.

The photo result after adjusting the white balance setting from 6600K to 4900K
We can also adjust the photo in post-editing or even partially change the color of the shadow area to achieve the desired result. For example when using Lightroom, we can adjust “Shadows” under “Split Toning”, and also change “Hue” to 215 to add a bluish tint to the shadow area. Adjust “Saturation” to around 40 to control how saturated is the blue color.
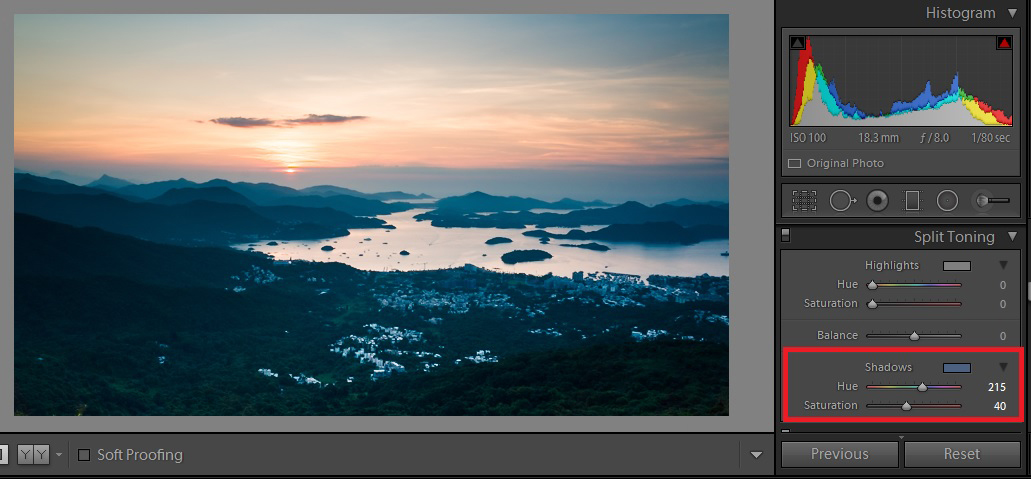
The Red box shows the parameters to adjust the shadow area
The following photos show the comparison before and after adjusting the blue color in the shadow area:

Colors are relatively dull without adjustment
After adding a bluish tint to the shadow area, the photo with greater contrast in color makes the rising sun stand out
After shooting, we can take the same route back to town. Since it’s a vast and open area up on the hill, make sure you wear enough to keep you warm if you have to wait for the sun to rise. Also stock up with enough food and water before you go as you can’t find any store there.
Related Articles

The golden light during sunset hours has always been one of the favorite photographic topics. However, it’s not easy to take photos of sunsets in Hong Kong as high-rise buildings are everywhere. This time we’ll take you to a famous sunset photography location on North West New Territories.